Friday 30 March 2012

Hungry Hounds and more fun stuff!

Hungry Hounds
The three part Math lesson is currently the big rage in Ontario. The documents that supports this approach are entitled, A Guide to Effective Instruction in Math. There are guides for each of the Math strands.  These documents provide practical lessons and activities to support this new way of learning and thinking.

The guides can be found here:
http://sites.google.com/site/ocdsbministryresources/Home/numeracy-support-resources/guides-to-effective-instruction-in-mathematics

My student teacher is really keen on trying new things so she is taking everything that she is learning from university, our Math Instructional Coach, (and me) and attempting to implement it. She found this adorable activity in the Measurement Guide to Effective Instruction in Math and decided to try it with my students.

Here's how it works:
Each of the children makes their own "Hungry Hound." These hounds are made from basic margarine/yogurt containers. The children decorate them to look like cute dogs. The kids LOVED making their own hound, and they couldn't wait to feed them too! The children use their hounds to compare the capacity of containers. Here is one of the Hungry Hounds that was created by a student.
Hungry Hound ready to be fed!
My student teacher had each child estimate how many scoops of wood chips would fit into their Hungry Hound. Afterwards, we decided that the wood chips were too messy. We thought of water, but figured that would be a disaster too. Maybe rice or beans next time!

So the children made their estimations and then actually measured the capacity of their Hungry Hounds. They recorded their estimations and measurements for their own hounds and then did the same for another classmate's. They really enjoyed this.


Once the children had two hounds to compare, they had to answer the question "Which Hungry Hound has the greater capacity? Following this answer, they had to explain why by completing the sentence, "I know this because ..."


Hungry Hound worksheet
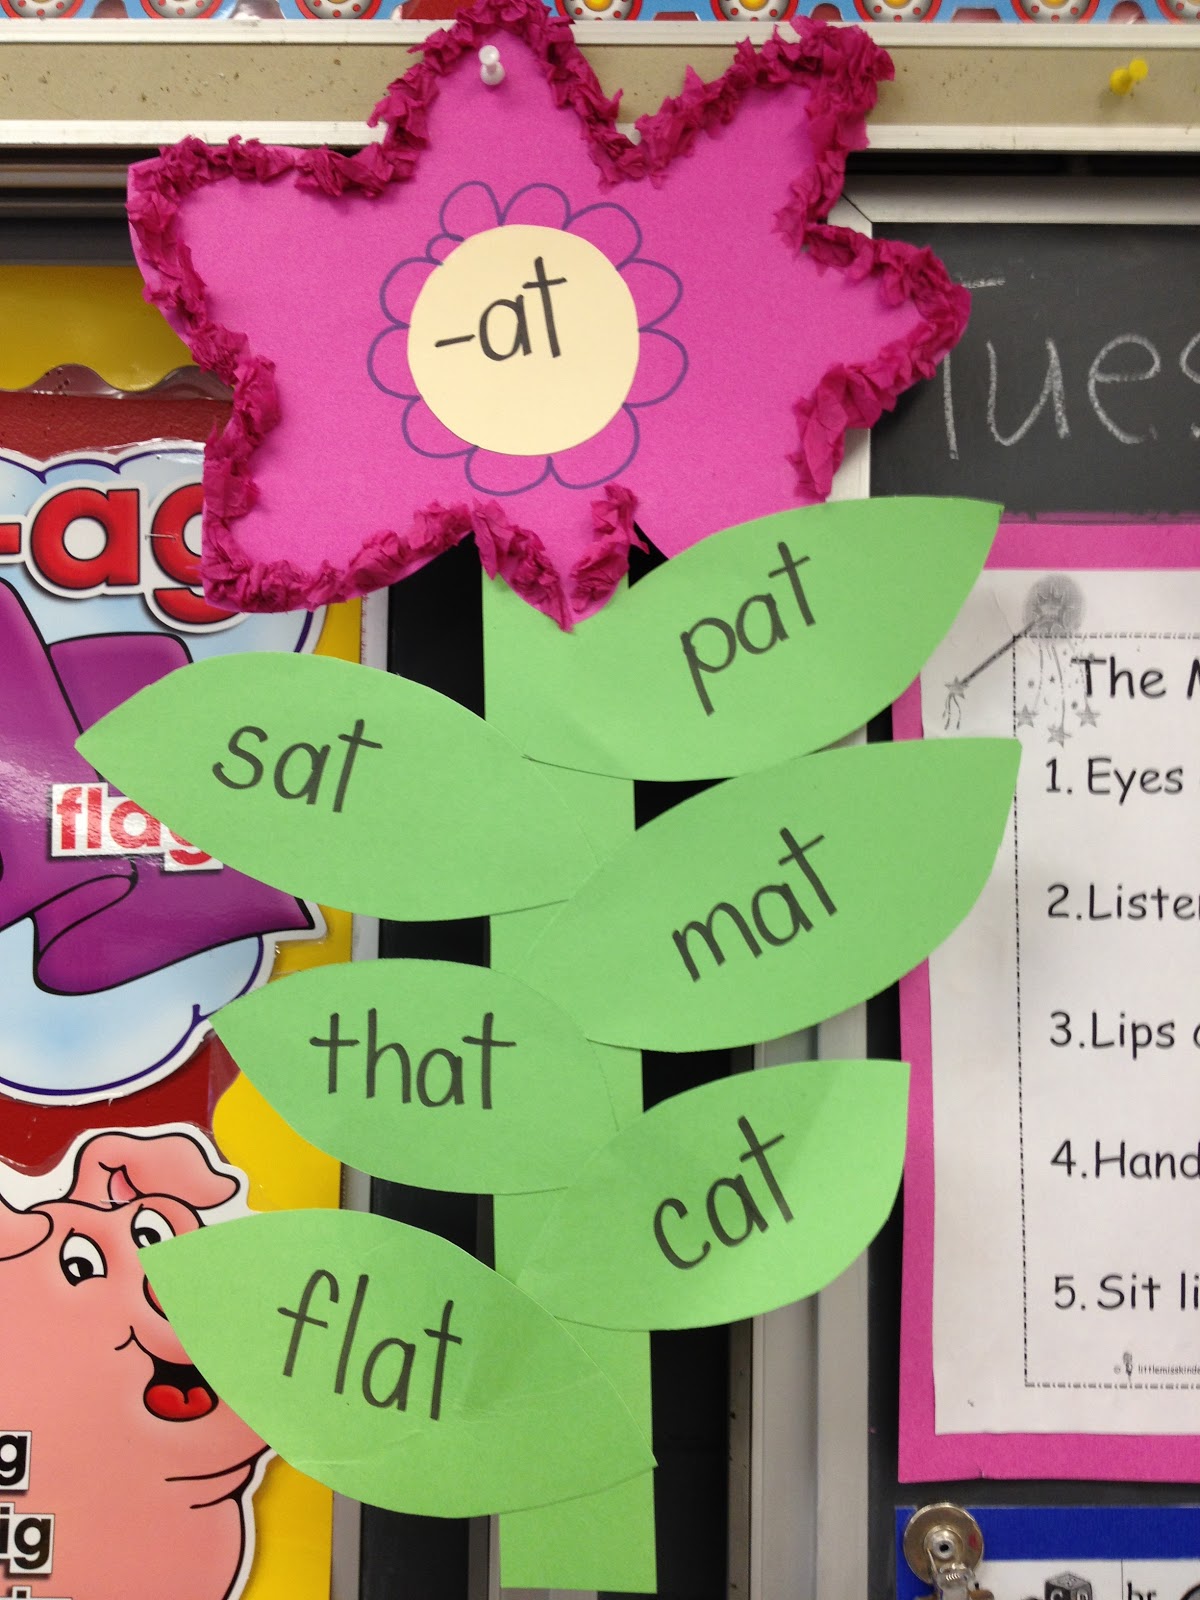
 Such an adorable activity, the kids loved it! I'm not sure if they even knew that they were learning! Sweet!

Math Scrapbooks
Our Math Instructional Coach shared a really cool idea with us in our last session with her - Math scrapbooks. The Math scrapbook is created by using a plain piece of bristol board, cutting it in half for the front and back cover, and attach it by using three round binder clips. Instead of having the students draw pictures of what they are completing in Math, she takes pics with her iPhone and quickly uploads and prints them off for her students. They use the pictures the next day in their consolidation period. They paste the pic on a ledger sized page, and underneath write their reflections of what they learned from the lesson. It certainly saves on photocopying worksheets and it's a neat way to store work, rather than a boring duotang or notebook.

So, we are in full swing and already have three entries from this week.  The first pic they responded to was the one below. My student teacher read the poem, When Tilly Ate the Chili. In the poem, Tilly is desperate for water because she ate too much spicy chill. So, the students needed to figure out which glass would be the best glass for Tilly to drink out of - which glass had the greater capacity. So, she brought in various glasses and compared their capacities with the students. After they decided which glass had the greater capacity, we took this pic and they headed back to their desks to do a reflection in their Math scrapbooks. They glued the pic onto their ledger sized paper and wrote about what they had just learned. The responses were amazing! They understood the concept and articulated their thoughts beautifully!


Workstations/Centers
We have been busy preparing new Literacy Stations/Centers for the students. I am in love with Teachers Pay Teachers. It has been such a blessing to me (and my students) this year. How did I go so long without knowing about it? Who knows! I am just so thankful for all of the free resources. I hope to spend less of my own money on resources now that I have found this gem of a website. Anyway, I have found a ton of amazing resources created by other amazing teachers on TPT. I am very thankful for these talented individuals. I seriously don't know how they have the time to create them though (super teachers?)!

My centers are coming along and I am going to share a few that I have had my coop students help me  prepare. Here are my helpers. I am very blessed to have so many "assistants" this year.
Melanie and Jessica
I created this center board so that the students would know where they should go if and when they complete their work. I don't normally have "center time" unless there is only 15 minutes left before the end of a period. The student do, however, get center time when they complete their assigned class work. So, I have large numbers hanging from the ceiling so that students know where to find their center. It is working really well.
Center board
The center below is called "Sight Word Sandwich" - another idea I found online. Not sure where exactly I found the worksheet.... ?  I had one of my assistants cut out paper in the shapes of bread, tomato, meat slice, pickles, and lettuce. When the children are at this center, they are required to make me a sandwich, read the sight words on the sandwich, and then write them on the worksheet. They LOVE making me sandwiches. Sometimes my sandwiches are really big - stuffed with multiples slices of meat, pickles and tomato. It's super cute!
Sight Word Sandwich
This is another cute idea I found online. Digraph sort. Students look at picture, say the word, and place it into the proper holder. Another favourite amongst the gang!
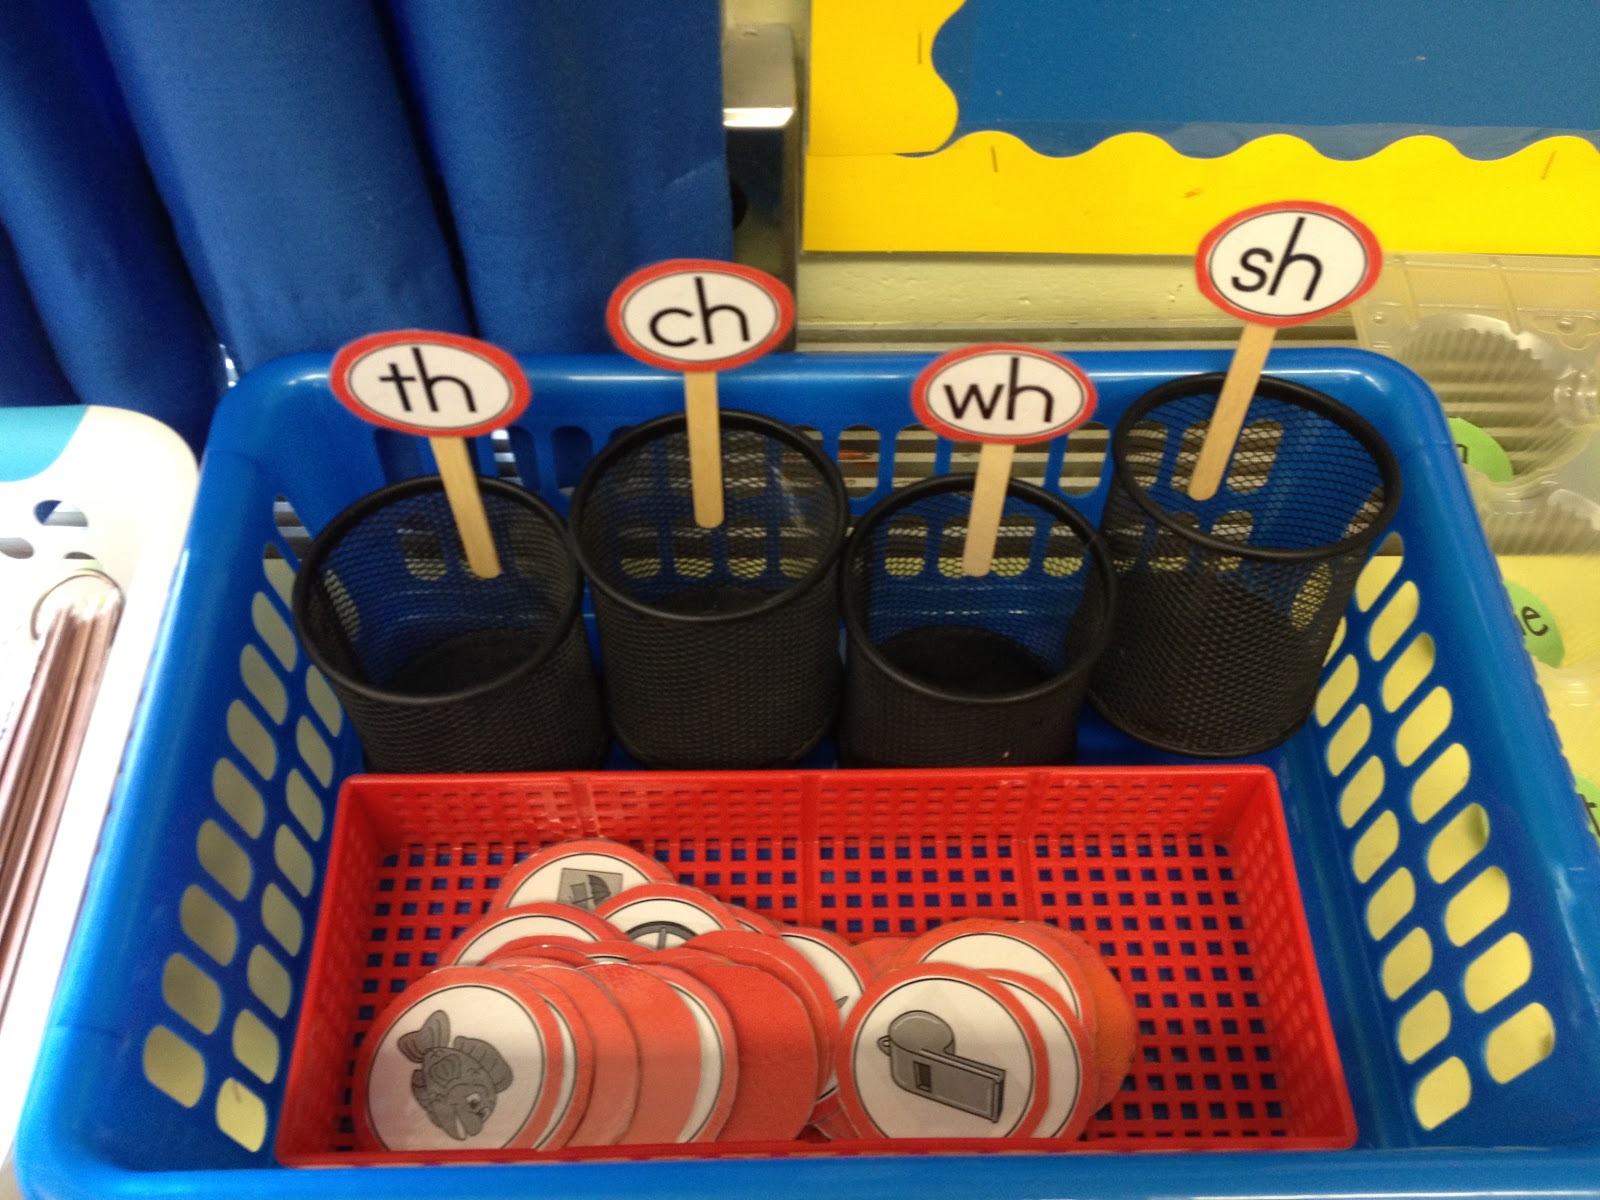
Digraph Sort
We started learning about contractions this week. Today we made contraction kites and they turned out super cute. Another idea found on Pinterest. I don't have pics of the students' yet since they aren't hanging yet...
Contraction Kites
 I found another cute contraction resource online. It's called Contraction Crocodile. So, today I quickly drew and cut out this croc. I think it's so adorable! There's a cute poem that goes with it all about the crocodile crunching up the two words to turn them into one - so I decided to show that in the croc's mouth! I think it turned out really beautifully!  More contractions on Monday!

We have also been focusing on using descriptive words in our writing. I printed off these large pics to represent our senses and then the students and I brainstormed words that could go under each heading. They used post it notes to write their ideas on and then put them on the appropriate posters. I used their post its to create these posters, which the students use all of the time now when writing.

Here's another center that I have set up. The students write out short descriptive phrases to represent the pictures. Here are a few examples of their work.

Here are some "feelings" posters that we created using the same post-it strategy. The focus was on writing synonyms for the feelings. The kids did a great job!

I love my job! 
Have a great weekend everyone!

~AC


Wednesday 28 March 2012

Cinnamon Bun Recipe

I have been asked to share the cinnamon bun recipe I used in a previous post. Here it is! Enjoy!


No-Yeast Cinnamon Buns - found on Pinterest!

Preheat oven to 425ºF.

Filling:
  • 3/4 cup packed brown sugar
  • 1/2 cup granulated sugar
  • 1 tablespoon cinnamon
  • 1/2 teaspoon coarse sea salt
  • 2 tablespoons butter, melted
Mix filling ingredients in a small bowl and stir with a fork until blended; set aside.

Dough:
  • 2 1/2 cups flour, plus more for rolling out dough
  • 1/4 cup granulated sugar
  • 1 1/2 teaspoons baking powder
  • 1/2 teaspoon baking soda
  • 1/2 teaspoon coarse sea salt
  • 1 cup buttermilk OR 1 cup milk and a tablespoon of lemon or lime juice
  • 7 tablespoons butter, melted
To make the dough, whisk together the flour, sugar, baking powder, baking soda and salt in a bowl.

In a separate small bowl, whisk together the buttermilk and 4 tablespoons of the melted butter. 
Pour over the dry ingredients, and stir together with a wooden spoon until it forms a scraggly-looking dough.
Knead a few times until it becomes smooth.
Separate the dough into two balls. On a floured surface, use a rolling pin to flatten out one of the balls .Sprinkle an even amount of cinnamon-sugar filling over each flattened piece of dough.


*
Gently pat the filling into dough
Roll each filled dough into a log
Cut each rolled log into eight equal pieces, you should have 16 rolls in total now. 

*
Using a pastry brush, coat an 11-inch by 8-inch rectangular glass or ceramic baking pan with 1 tablespoon of the melted butter.
Arrange cut rolls in the pan, and press down with your hand to flatten slightly. Brush tops with the remaining melted butter.
*
Bake for 20 minutes, or until golden brown and filling is bubbling from the top.

Cream Cheese Icing: 
  • 2 ounces cream cheese, softened
  • 3 tablespoons buttermilk
  • 2/3 cup (79 grams) icing sugar
You can always just use regular icing too!

Drizzle icing over cinnamon rolls and serve immediately.

YU-MMY! Enjoy!

Amanda

*Pics found online - not mine.


Flat Stanley, my classroom and more!

We all know and love the Flat Stanley series, right? Well, I decided to read the book aloud to my students right before March Break. It was a hit, for sure. I found some adorable activities online, and even thought of a few myself! First things first, we all made our very own flat person - a flattened version of ourselves. I took pics of all my students (as well as all the teachers in the class too). We glued our faces onto a sweet little paper doll. Here is mine!

Flat Mrs. Campbell
We then made cute little sleeping bags for our flat people. It said "A quiet place for me to rest while I am not on an adventure!" (Sorry no pic) I was a little worried that they might get ruined on the route home, so I laminated each of the students' flat people and sent them home in large brown envelopes. Success!

Students were asked to take their flat person on at least one adventure over their March Break. Their assignment was to fill out an information sheet and attach a picture to share with the class. Their projects came back completed, and they are adorable!

I was going to create a cute bulletin board with them (as you can see below), but I decided they were so cute I had to create a book instead to share with our grade 1 families. The book is currently circulating the homes in our class. All of our class books are treasures, but this one is for sure the cutest. Here's the board I prepared, but never used. Check out my free hand drawing and paint job of good ole' Flat Stanley. Fun!


Last week I started planning a mini-unit on inferring, using the NO David! series by David McPhail. I decided to introduce the students to inferring by letting them see what was in my bag! Whoa! The kids were super excited to find out what treasures I had hidden in it! I told them that we would be using our schema (the stuff in our brain we already know), and evidence (the items in my bag) to infer (make a guess/tell what it means about Mrs. Campbell). Here's what they came up with!


Their responses were absolutely priceless, and best of all - they got it! They were pretty accurate. I can't wait to start some fun inferring and point of view exercises using No David! I'll share and post pics later.

Well, another day is over and I am exhausted! Time for bed! Nighty night and thanks for reading. I would love to hear your comments!

Amanda

Monday 26 March 2012

Synonym Chefs!

Today was a fabulous day in Grade 1! I have so much to share, but first I want to show you some of the fun stuff we have been doing in the class over the last month or so.

We have been working on becoming expert word family readers and writers. The kids have been bombarded with so many word family exercises recently. It's time to take a break.... Here's a cute one though - word family flowers. A super cute idea that I found on Pinterest.

For the past two weeks it has been crazy hot and so I thought getting a Springy garden out in the hallway would be in order. I also wanted the kids to show off their amazing word family talents and artistic abilities.  (Too bad the weather didn't last and we are back to - 14 degree temps this week. Oh well, it was fun while it lasted.)
Word Family Flowers

Word Family Flowers from a distance

My sample copy - up close!
 I also have been in the re-designing mode. I have had my word wall on a large chalkboard for the past few years. It worked - but was ugly. I decided to forgo the magnetic words on the chalkboard and instead try colour coded words on a nice blue bulletin board. Well, I am happy with the outcome, and the kids are using it a lot more! That's the whole point, right?
Word Wall
 Okay, so as for today.... We made "synonym buns". A great idea I stole from www.thefirstgradeparade.blogspot.com Wow, that girl is incredible! Anyway, I basically stole her whole concept and we did it today. It was awesome. We read a great book on synonyms called Pitch and Throw, Grasp and Know, and then had a brainstorming session. I told them that we were going to be synonym chefs. I made them each a chef hat, with the assistance of my EA, coop student and student teacher. Thank goodness I have help this year!

 It took the kids a while to get into the "synonym" mode. At first, I asked if anyone could give me a synonym for the word "big", the answers I got were "pig, jig, rig".... Too much word family work? :) Anyway, I had them do some independent brainstorming using the cute worksheet I downloaded from the website above.

Students completed this independently and then used this information to complete their synonym buns.

Terrible expression Mrs. Campbell! Check out the chef hats! Super cute!

Synonym buns created from worksheet!
 After we completed our synonym buns, we made cinnamon buns. YUM! The kids were super excited to share one with our Vice Principal. Here we are taking a field trip to her office, presenting her with a yummy cinnamon bun! She was VERY impressed!

Check out the cute hats!
After completing our work in language today, I decided that the students definitely needed some extra practice with synonyms to solidify their learning. Over the weekend, I found a sweet idea on Pinterest and thought it would be perfect as a follow-up. So, I called our friends at McDonald's and they donated 30 french fry holders to my class so I could create this interactive learning centre. Thank you McDonald's! After school today, I raced to have this ready for tomorrow. I can't wait for the kids to see it!

How does it work? Students will choose a french fry from the container at the bottom right hand corner. They will read the word and decide which holder it belongs. How will they know? They will be prompted to place it into a holder that is a synonym for that word. Super fun!

Example: 
french fry word: angry
french fry holder it should be placed in: mad

Check out the cute anchor chart and our yummy synonym buns!
Finally, I wanted to share with you our Bucket Filler wall. Our focus this year is to be bucket fillers, not bucket dippers. We read several books related to this concept, but the one I really focused on is called "Have You Filled a Bucket Today?" Students write on little slips that say, "I want to fill __________'s bucket by saying ____________". Students often write little things like, "I like your hair or shirt or dress". It's a really nice way of warming someone's heart. I thought it might get old quickly, but this has been up for a couple months and the pockets are filled almost every day! Yay!


Thanks for reading. I really enjoy sharing all this with you.

Amanda

Saturday 24 March 2012

Cinnamon Buns

I am making "Synonym Buns" on Monday with my class so I wanted to try and find an easy cinnamon bun recipe to make with my students too! Word work AND procedural writing!

I found a great recipe that is easy, requires no yeast, and ready to eat in less than an hour!

Take a peek at the delicious buns I made! Monday is going to be great!

Stay tuned for pics!
Yummy!

Happenings over the last month!

Wow! Lots of great things have been happening! I just had March Break with my husband, Curtis, and my kids!  I definitely needed the break and it was fabulous! I especially loved that Curtis was able to take a few days off to enjoy some time with us. We all took a trip to Niagra Falls and enjoyed many of the attractions, including the amazing water park at the Fallsview Resort. The kids had a blast!
 Bailey Boo checking out the gorgeous view!
 Amazing watermark. This is only part of it.
 Calvin and Bailey in their Niagra Falls matching T-shirts. BFF's
My amazing family!

Before we left for March Break, I had many things going on in the classroom. The kids were excited to celebrate St. Patrick's Day, but were disappointed that we wouldn't be at school on the 17th. So, instead we celebrated early and made leprechaun traps. It was such a fun, green day! Take a peek.

My amazing EA and I.
Our leprechaun traps. Look at those little footprints!

The kids were so excited to see that the leprechaun left a message!
A closer look.
Lots to share, but that's good for now!

Until next time,
Amanda

New Blogger

I'm new to the blogging world, but have been wanting to do this for awhile. I have never had the time to learn how to do it, but decided to take the plunge still not knowing too much. I guess I'll learn as I go.

So, in this blog, I have decided to share life as a teacher, and whatever else may pop up. I absolutely LOVE and am passionate about teaching! It such a privilege to help shape the lives of so many children each day. I only wish my own children could be part of the group that spends the day with me. Since that's not possible, I cherish all the moments I have with them at home.

Thank you for taking the time to read. I hope I can provide you with lots of ideas that you can bring into your own classroom!

Amanda